Fusing Glassline Paper
Tutorial

When fusing Glassline paper it is important to follow the Glassline fusing instructions to ensure the glass and paper are fused correctly in a glass fusing kiln
With plain and crinkled papers, there is a wide choice available for use in glass fusing and fused glass jewelry projects
The following small tutorial was carried out with crinkled Glassline paper and clear Bullseye fusing glass.
The glass is about 1 1/2 inches x 2 inches.
When fusing this paper a gap of 1/4" from the glass edge to the paper is advisable. If the paper is close to the edge the glass will not seal properly and the paper may crinkle.
The paper can first be colored with Glassline pens and/or chalks prior to firing.
Paper may be glued to the glass or to other pieces of paper. Use a minimum of glue to hold the paper in place and be sure to wipe the excess glue away or it will show up after fusing is complete.
After the paper is in place 2mm glass stringer pieces should be placed at each corner, a small dob of Elmer's glue will hold them in place.
If a stringer isn't available a small pieces of frit can be used.
It is most important to use some form of spacer between the glass other wise carbon will be trapped between the glass leading to a smoky gray color or large air bubbles.
Fast firing of the glass can produce the same result.
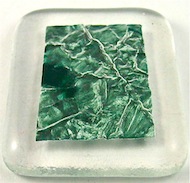
The set-up used for the pictured fused glass paper includes stringer pieces placed at each corner.
As the glass was small, a modified firing schedule was used in place of the Glassline schedule below.
The Glassline sample firing rate given for the paper is as follows:
Seg Rate Temp Hold
1 250 1000 4.00 hours
2 250 1470 15 minutes
3 9999 960 1.00 hour
4 250 200 none
This schedule is for 2 pieces of glass 10"x 10".
As can
be seen from the photo, the crinkled paper has held its shape and has
not shown any ill effects from the glass fusing process.
Return From Fusing Glassline Paper To The Glassworks
Return To Home Page


